
1.权限控制 RBAC
设置配置环境:
[candidate@node-1] $ kubectl config use-context k8s
Context
为部署流水线创建一个新的 ClusterRole 并将其绑定到范围为特定的 namespace 的特定 ServiceAccount。
Task
创建一个名为 deployment-clusterrole 且仅允许创建以下资源类型的新 ClusterRole:
Deployment
StatefulSet
DaemonSet
在现有的 namespace app-team1 中创建一个名为 cicd-token 的新 ServiceAccount。
限于 namespace app-team1 中,将新的 ClusterRole deployment-clusterrole 绑定到新的 ServiceAccount cicd-token。
考点:RBAC 授权模型的理解。
#参考
kubectl create clusterrole -h
kubectl create rolebinding -h

#考试时务必执行,切换集群。模拟环境中不需要执行。
kubectl config use-context k8s

candidate@master01:~$ kubectl create  clusterrole deployment-clusterrole  --verb=create --resource=deployments,statefulsets,daemonsets
clusterrole.rbac.authorization.k8s.io/deployment-clusterrole created

candidate@master01:~$ kubectl describe clusterrole deployment-clusterrole
Name:         deployment-clusterrole
Labels:       <none>
Annotations:  <none>
PolicyRule:
  Resources          Non-Resource URLs  Resource Names  Verbs
  ---------          -----------------  --------------  -----
  daemonsets.apps    []                 []              [create]
  deployments.apps   []                 []              [create]
  statefulsets.apps  []                 []              [create]

candidate@master01:~$ kubectl -n app-team1 create sa cicd-token
serviceaccount/cicd-token created
candidate@master01:~$ kubectl -n app-team1 create rolebinding cicd-token-rolebinding --clusterrole=deployment-clusterrole --serviceaccount=app-team1:cicd-token
rolebinding.rbac.authorization.k8s.io/cicd-token-rolebinding created

#验证
candidate@master01:~$ kubectl auth can-i create deployment --as system:serviceaccount:app-team1:cicd-token
no

candidate@master01:~$ kubectl auth can-i create deployment -n app-team1 --as system:serviceaccount:app-team1:cicd-token
yes

candidate@master01:~$ kubectl -n app-team1 describe rolebinding cicd-token-rolebinding
Name:         cicd-token-rolebinding
Labels:       <none>
Annotations:  <none>
Role:
  Kind:  ClusterRole
  Name:  deployment-clusterrole
Subjects:
  Kind            Name        Namespace
  ----            ----        ---------
  ServiceAccount  cicd-token  app-team1
2.查看 pod 的 CPU
设置配置环境:
[candidate@node-1] $ kubectl config use-context k8s
Task
通过 pod label name=cpu-loader,找到运行时占用大量 CPU 的 pod,
并将占用 CPU 最高的 pod 名称写入文件 /opt/KUTR000401/KUTR00401.txt(已存在)
考点:kubectl top –l 命令的使用
#参考
kubectl top pod -h

考试时务必执行,切换集群。模拟环境中不需要执行。
# kubectl config use-context k8s

candidate@master01:~$ kubectl top pod -l name=cpu-loader --sort-by=cpu -A
NAMESPACE   NAME                          CPU(cores)   MEMORY(bytes)
cpu-top     redis-test-ff9fd7d78-dsbf2    3m           5Mi
cpu-top     nginx-host-56c8f5b697-ltdmd   0m           4Mi
cpu-top     test0-75d9886fc7-44b28        0m           5Mi

root@master01:~# echo redis-test-ff9fd7d78-dsbf2 >> /opt/KUTR000401/KUTR00401.txt
root@master01:~# cat /opt/KUTR000401/KUTR00401.txt
redis-test-ff9fd7d78-dsbf23.配置网络策略 NetworkPolicy
设置配置环境:
[candidate@node-1] $ kubectl config use-context hk8s
Task
在现有的 namespace my-app 中创建一个名为 allow-port-from-namespace 的新 NetworkPolicy。
确保新的 NetworkPolicy 允许 namespace echo 中的 Pods 连接到 namespace my-app 中的 Pods 的 9000 端口。
进一步确保新的 NetworkPolicy:
不允许对没有在监听 端口 9000 的 Pods 的访问
不允许非来自 namespace echo 中的 Pods 的访问
双重否定就是肯定,所以最后两句话的意思就是:
仅允许端口为 9000 的 pod 方法。
仅允许 echo 命名空间中的 pod 访问。
考点:NetworkPolicy
考试时务必执行,切换集群。模拟环境中不需要执行。
# kubectl config use-context hk8s
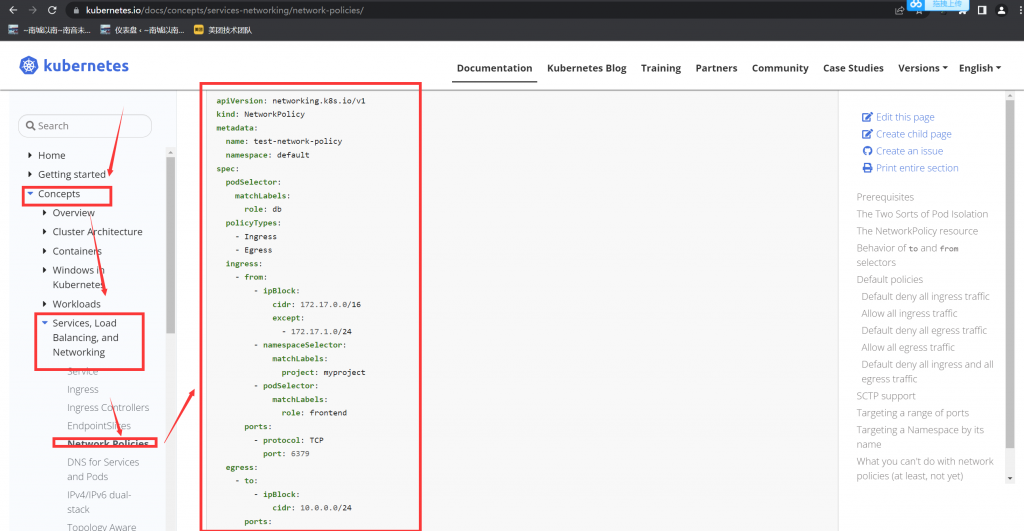
参考官方文档,拷贝 yaml 文件内容,并修改。
这里要注意,模拟题和真题截图里都有提到 echo 这个 namespace,但是和真题的截图比较,你会发现,两个 echo 出现的位置不同,一个作为访问者,一个作为被访问者。
所以不要搞混了。他们其实只是个名字而已,叫什么都无所谓,但要分清访问和被访问。


查看所有 ns 的标签 label
kubectl get ns --show-labels
如果访问者的 namespace 没有标签 label,则需要手动打一个。如果有一个独特的标签 label,则也可以直接使用。
kubectl label ns echo project=echo

candidate@master01:~$ kubectl get ns echo --show-labels
NAME   STATUS   AGE   LABELS
echo   Active   50d   kubernetes.io/metadata.name=echo,project=echo

candidate@master01:~$ vim NetworkPolicy.yaml
apiVersion: networking.k8s.io/v1
kind: NetworkPolicy
metadata:
  name: allow-port-from-namespace
  namespace: my-app
spec:
  podSelector:
    matchLabels: {}
  policyTypes:
    - Ingress
  ingress:
    - from:
        - namespaceSelector:
            matchLabels:
              project: echo
      ports:
        - protocol: TCP
          port: 9000

candidate@master01:~$ kubectl apply -f NetworkPolicy.yaml
networkpolicy.networking.k8s.io/allow-port-from-namespace configured

candidate@master01:~$ kubectl describe networkpolicies -n my-app
Name:         allow-port-from-namespace
Namespace:    my-app
Created on:   2023-03-27 15:12:32 +0800 CST
Labels:       <none>
Annotations:  <none>
Spec:
  PodSelector:     <none> (Allowing the specific traffic to all pods in this namespace)
  Allowing ingress traffic:
    To Port: 9000/TCP
    From:
      NamespaceSelector: project=echo
  Not affecting egress traffic
  Policy Types: Ingress
4.暴露服务 service
设置配置环境:
[candidate@node-1] $ kubectl config use-context k8s
Task
请重新配置现有的 deployment front-end 以及添加名为 http 的端口规范来公开现有容器 nginx 的端口 80/tcp。
创建一个名为 front-end-svc 的新 service,以公开容器端口 http。
配置此 service,以通过各个 Pod 所在的节点上的 NodePort 来公开他们。
考点:将现有的 deploy 暴露成 nodeport 的 service。
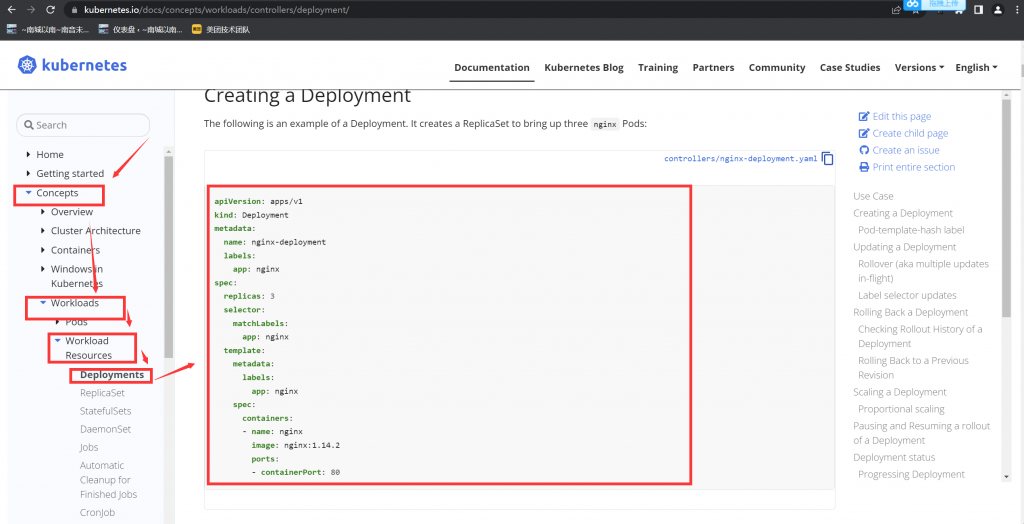
检查 deployment 信息,并记录 SELECTOR 的 Lable 标签,这里是 app=front-end
candidate@master01:~$ kubectl get deployments front-end  -owide
NAME        READY   UP-TO-DATE   AVAILABLE   AGE   CONTAINERS   IMAGES              SELECTOR
front-end   1/1     1            1           50d   nginx        vicuu/nginx:hello   app=front-end

#如下图添加四行内容
candidate@master01:~$ kubectl edit  deployments front-end
deployment.apps/front-end edited

#暴露对应端口
candidate@master01:~$ kubectl expose deployment  front-end  --type=NodePort --port=80 --target-port=80 --name=front-end-svc
service/front-end-svc exposed
#注意考试中需要创建的是 NodePort,还是 ClusterIP。如果是 ClusterIP,则应为--type=ClusterIP
#--port 是 service 的端口号,--target-port 是 deployment 里 pod 的容器的端口号。

#暴露服务后,检查一下 service 的 selector 标签是否正确,这个要与 deployment 的 selector 标签一致的。
candidate@master01:~$ kubectl get deployments front-end -owide
NAME        READY   UP-TO-DATE   AVAILABLE   AGE   CONTAINERS   IMAGES              SELECTOR
front-end   1/1     1            1           50d   nginx        vicuu/nginx:hello   app=front-end
candidate@master01:~$ kubectl get svc front-end-svc -owide
NAME            TYPE       CLUSTER-IP       EXTERNAL-IP   PORT(S)        AGE   SELECTOR
front-end-svc   NodePort   10.103.140.216   <none>        80:31390/TCP   83s   app=front-end

#如果你 kubectl expose 暴露服务后,发现 service 的 selector 标签是空的<none>,或者不是 deployment 的
则需要编辑此 service,手动添加标签。(模拟环境里暴露服务后,selector 标签是正确的。但是考试时,有时 service 的 selector 标签是 none)
kubectl edit svc front-end-svc
在 ports 这一小段下面添加 selector 标签
 selector:
 app: front-end

#最后 curl 检查
kubectl get pod,svc -o wide
curl 所在的 node 的 ip 或主机名:30938
curl svc 的 ip 地址:80
(注意,只能 curl 通 svc 的 80 端口,但是无法 ping 通的。)
candidate@master01:~$ curl 10.103.140.216
Hello World ^_^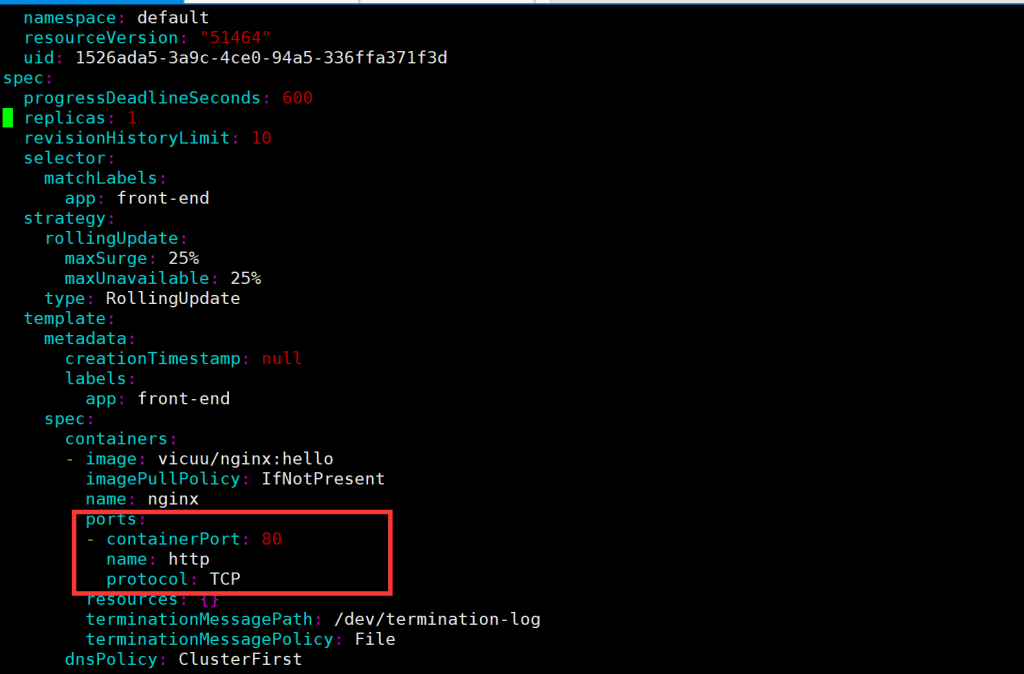
5.创建 Ingress
设置配置环境:
[candidate@node-1] $ kubectl config use-context k8s
Task
如下创建一个新的 nginx Ingress 资源:
名称: ping
Namespace: ing-internal
使用服务端口 5678 在路径 /hello 上公开服务 hello
可以使用以下命令检查服务 hello 的可用性,该命令应返回 hello:
curl -kL <INTERNAL_IP>/hello
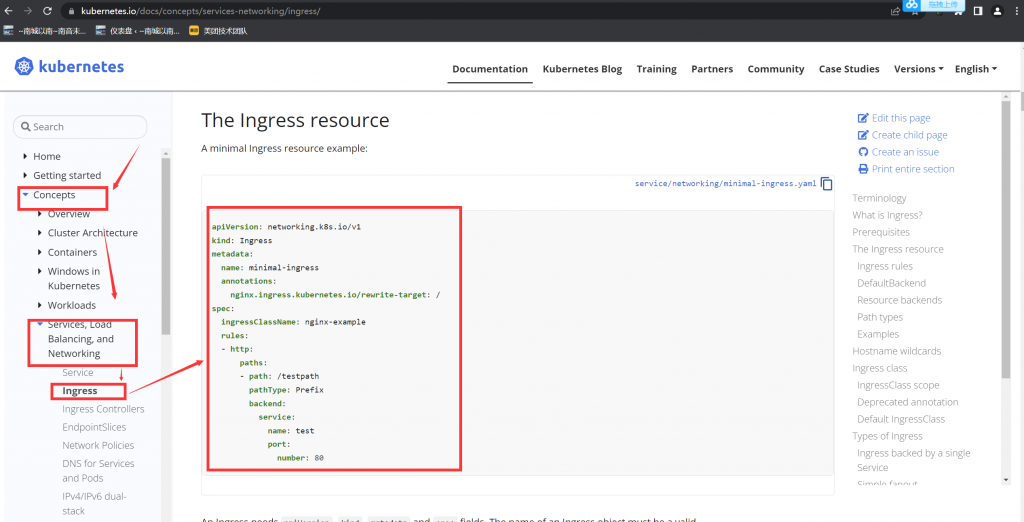
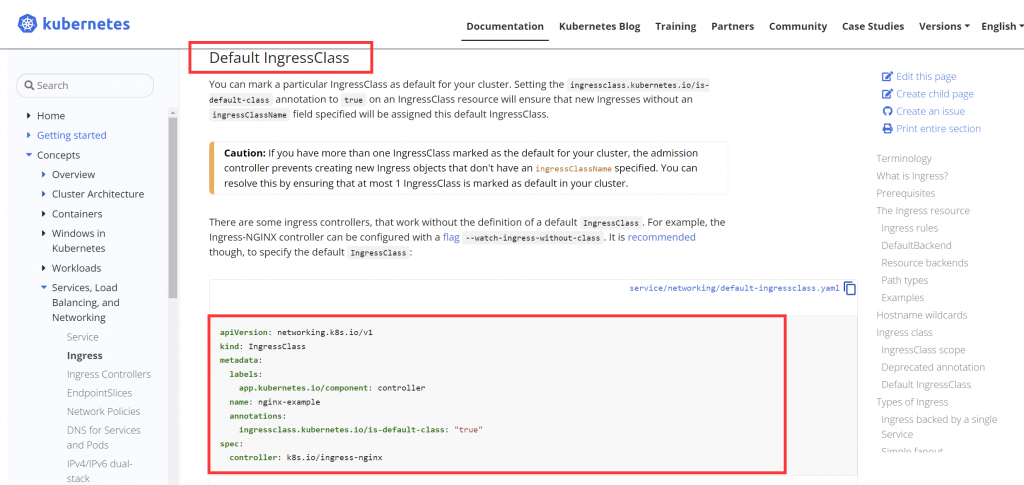
#考试时务必执行,切换集群。模拟环境中不需要执行。
# kubectl config use-context k8s
开始操作

candidate@master01:~$ vim ingress.yaml
apiVersion: networking.k8s.io/v1
kind: IngressClass
metadata:
  labels:
    app.kubernetes.io/component: controller
  name: nginx-example    #自定义命名,下面会引用到
  annotations:
    ingressclass.kubernetes.io/is-default-class: "true"
spec:
  controller: k8s.io/ingress-nginx
---
apiVersion: networking.k8s.io/v1
kind: Ingress
metadata:
  name: ping             #题目规定
  namespace: ing-internal   #题目规定
  annotations:
    nginx.ingress.kubernetes.io/rewrite-target: /  ##因为考试环境有多套,不清楚具体抽中的是哪套。在 1.26 的考试里,先写上这行,如果 apply 时报错需要指定域名,则注释这行再 apply,就成功了。
spec:
  ingressClassName: nginx-example  #使用上面ingressclass定义的名字
  rules:
  - http:
      paths:
      - path: /hello  #题目规定路径
        pathType: Prefix
        backend:
          service:
            name: hello   #题目规定服务名称
            port:
              number: 5678  #题目规定端口


#最后 curl 检查
# 通过 get ingress 查看 ingress 的内外 IP,然后通过提供的 curl 测试 ingress 是否正确。
# 做完题后,略等 3 分钟,再检查,否则可能还没获取 IP 地址。或者可以先去做别的题,等都做完了,再回来检查这道题,一下,记得回来检查时,先使用 kubectl
config use-context k8s 切换到此集群。
kubectl get ingress -n ing-internal
curl ingress 的 ip 地址/hello
candidate@master01:~$ kubectl get ingress -n ing-internal
NAME   CLASS           HOSTS   ADDRESS         PORTS   AGE
ping   nginx-example   *       10.98.168.226   80      37s
candidate@master01:~$ curl 10.98.168.226/hello
Hello World ^_^
6.扩容 deployment 副本数量
设置配置环境:
[candidate@node-1] $ kubectl config use-context k8s
Task
将 deployment presentation 扩展至 4 个 pods
kubectl scale deployment -h
考试时务必执行,切换集群。模拟环境中不需要执行。
# kubectl config use-context k8s
开始操作
先检查一下现有的 pod 数量(可不检查)
candidate@master01:~$ kubectl get deployments presentation -owide
NAME           READY   UP-TO-DATE   AVAILABLE   AGE   CONTAINERS   IMAGES              SELECTOR
presentation   1/1     1            1           50d   nginx        vicuu/nginx:hello   app=presentation
candidate@master01:~$ kubectl get pods -l app=presentation
NAME                           READY   STATUS    RESTARTS       AGE
presentation-d9dbc88cb-ff8g5   1/1     Running   4 (128m ago)   50d

扩展成 4 个
kubectl scale deployment presentation --replicas=4
candidate@master01:~$ kubectl scale  deployment presentation --replicas=4
deployment.apps/presentation scaled
candidate@master01:~$ kubectl get pods -l app=presentation
NAME                           READY   STATUS    RESTARTS       AGE
presentation-d9dbc88cb-24wbs   1/1     Running   0              4s
presentation-d9dbc88cb-dpmcl   1/1     Running   0              4s
presentation-d9dbc88cb-ff8g5   1/1     Running   4 (129m ago)   50d
presentation-d9dbc88cb-vj4vj   1/1     Running   0              4s
7.调度 pod 到指定节点
设置配置环境:
[candidate@node-1] $ kubectl config use-context k8s
Task
按如下要求调度一个 pod:
名称:nginx-kusc00401
Image:nginx
Node selector:disk=ssd
考点:nodeSelect 属性的使用
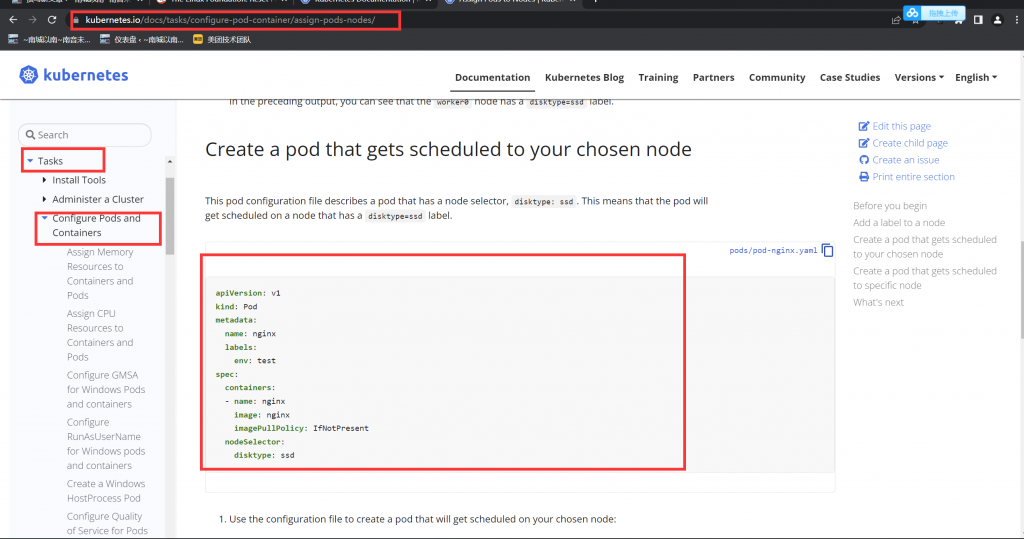
考试时务必执行,切换集群。模拟环境中不需要执行。
# kubectl config use-context k8s
开始操作
先检查一下是否有这个 pod,应该是没有创建的,所以需要创建
kubectl get pod -A|grep nginx-kusc00401
# 确保 node 有这个 labels,考试时,检查一下就行,应该已经提前设置好了 labels。
kubectl get nodes --show-labels|grep 'disk=ssd'
candidate@master01:~$ kubectl get node --show-labels
NAME       STATUS   ROLES           AGE   VERSION   LABELS
master01   Ready    control-plane   50d   v1.26.0   beta.kubernetes.io/arch=amd64,beta.kubernetes.io/os=linux,kubernetes.io/arch=amd64,kubernetes.io/hostname=master01,kubernetes.io/os=linux,node-role.kubernetes.io/control-plane=,node.kubernetes.io/exclude-from-external-load-balancers=
node01     Ready    <none>          50d   v1.26.0   beta.kubernetes.io/arch=amd64,beta.kubernetes.io/os=linux,disk=ssd,kubernetes.io/arch=amd64,kubernetes.io/hostname=node01,kubernetes.io/os=linux
node02     Ready    <none>          50d   v1.26.0   beta.kubernetes.io/arch=amd64,beta.kubernetes.io/os=linux,kubernetes.io/arch=amd64,kubernetes.io/hostname=node02,kubernetes.io/os=linux

candidate@master01:~$ vim pod-disk-ssd.yaml
apiVersion: v1
kind: Pod
metadata:
  name: nginx-kusc00401 #题目规定名称
  labels:
    env: test
spec:
  containers:
  - name: nginx
    image: nginx  #题目规定镜像
    imagePullPolicy: IfNotPresent
  nodeSelector:
    disk: ssd #题目规定标签

candidate@master01:~$ kubectl apply -f pod-disk-ssd.yaml
pod/nginx-kusc00401 created

#检查
candidate@master01:~$ kubectl get pod nginx-kusc00401 -owide
NAME              READY   STATUS    RESTARTS   AGE     IP               NODE     NOMINATED NODE   READINESS GATES
nginx-kusc00401   1/1     Running   0          4m39s   10.244.196.169   node01   <none>           <none>
8.查看可用节点数量
设置配置环境:
[candidate@node-1] $ kubectl config use-context k8s
Task
检查有多少 nodes 已准备就绪(不包括被打上 Taint:NoSchedule 的节点),
并将数量写入 /opt/KUSC00402/kusc00402.txt
考点:检查节点角色标签,状态属性,污点属性的使用
考试时务必执行,切换集群。模拟环境中不需要执行。
# kubectl config use-context k8s
开始操作
# grep 的-i 是忽略大小写,grep -v 是排除在外,grep -c 是统计查出来的条数。
kubectl describe nodes | grep -i Taints | grep -vc NoSchedule
echo "查出来的数字" > /opt/KUSC00402/kusc00402.txt

candidate@master01:~$ kubectl describe node |grep -i taints|grep -vc NoSchedule
2
candidate@master01:~$ echo "2" > /opt/KUSC00402/kusc00402.txt
9.创建多容器的 pod
设置配置环境:
[candidate@node-1] $ kubectl config use-context k8s
Task
按如下要求调度一个 Pod:
名称:kucc8
app containers: 2
container 名称/images:
⚫ nginx
⚫ consul
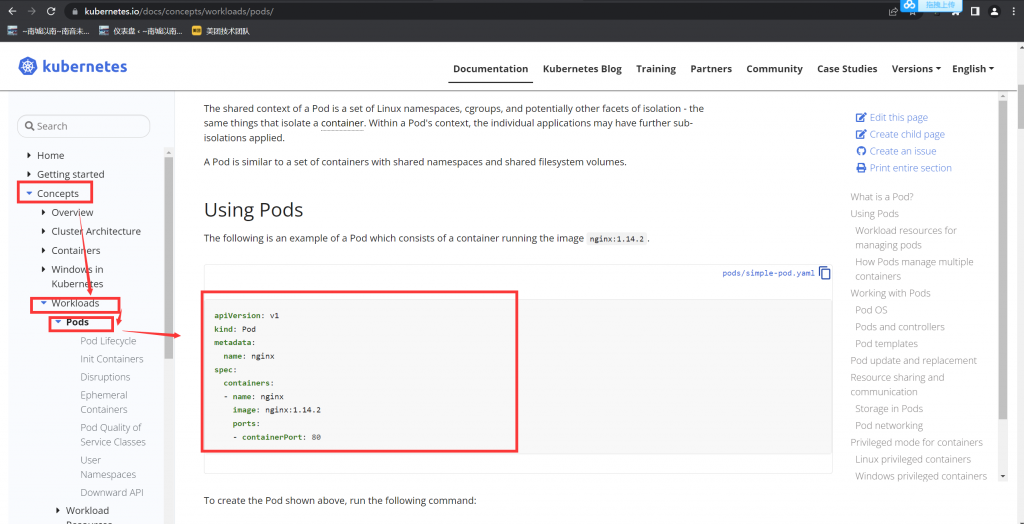
考试时务必执行,切换集群。模拟环境中不需要执行。
# kubectl config use-context k8s

candidate@master01:~$ vim pod-kucc.yaml
apiVersion: v1
kind: Pod
metadata:
  name: kucc8
spec:
  containers:
  - name: nginx
    image: nginx
    imagePullPolicy: IfNotPresent
  - name: consul
    image: consul
    imagePullPolicy: IfNotPresent

candidate@master01:~$ kubectl apply -f pod-kucc.yaml
pod/kucc8 created
candidate@master01:~$ kubectl get pods kucc8
NAME    READY   STATUS    RESTARTS   AGE
kucc8   2/2     Running   0          15s
10.创建 PV
[candidate@node-1] $ kubectl config use-context hk8s
Task
创建名为 app-config 的 persistent volume,容量为 1Gi,访问模式为 ReadWriteMany。
volume 类型为 hostPath,位于 /srv/app-config
考点:hostPath 类型的 pv

考试时务必执行,切换集群。模拟环境中不需要执行。
# kubectl config use-context k8s
直接从官方复制合适的案例,修改参数,然后设置 hostPath 为 /srv/app-config 即可。
开始操作

candidate@master01:~$ vim pv.yaml
apiVersion: v1
kind: PersistentVolume
metadata:
  name: app-config
  #  labels:
  #    type: local
spec:
  storageClassName: manual
  capacity:
    storage: 1Gi
  accessModes:
    - ReadWriteMany
  hostPath:
    path: "/srv/app-config"

candidate@master01:~$ kubectl apply -f pv.yaml
persistentvolume/app-config created

#检查
# RWX 是 ReadWriteMany,RWO 是 ReadWriteOnce。
candidate@master01:~$ kubectl get pv app-config
NAME         CAPACITY   ACCESS MODES   RECLAIM POLICY   STATUS      CLAIM   STORAGECLASS   REASON   AGE
app-config   1Gi        RWX            Retain           Available           manual                  40s
11.创建 PVC
设置配置环境:
[candidate@node-1] $ kubectl config use-context ok8s
Task
创建一个新的 PersistentVolumeClaim:
名称: pv-volume
Class: csi-hostpath-sc
容量: 10Mi
创建一个新的 Pod,来将 PersistentVolumeClaim 作为 volume 进行挂载:
名称:web-server
Image:nginx:1.16
挂载路径:/usr/share/nginx/html
配置新的 Pod,以对 volume 具有 ReadWriteOnce 权限。
最后,使用 kubectl edit 或 kubectl patch 将 PersistentVolumeClaim 的容量扩展为 70Mi,并记录此更改。
考点:pvc 的创建 class 属性的使用,–record 记录变更
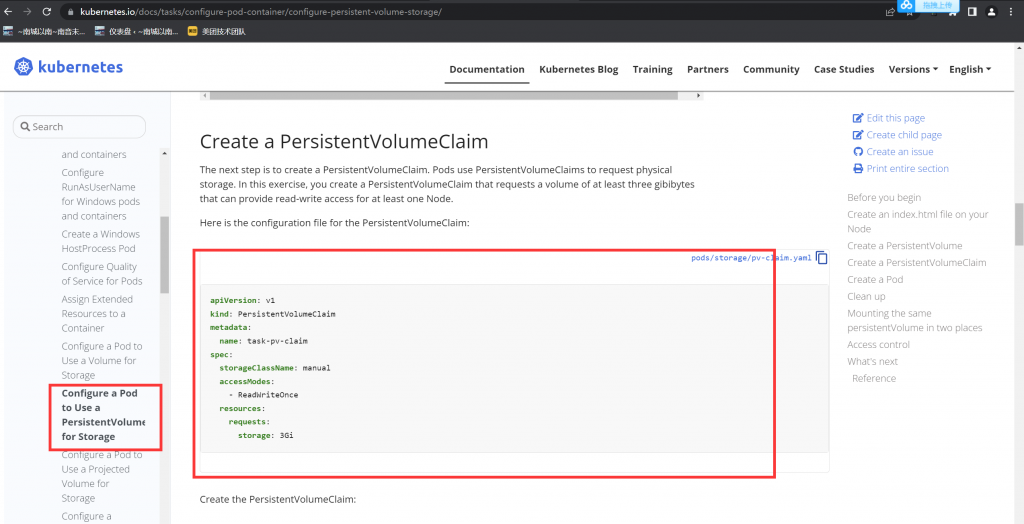
考试时务必执行,切换集群。模拟环境中不需要执行。
# kubectl config use-context ok8s
根据官方文档复制一个 PVC 配置,修改参数,不确定的地方就是用 kubectl 的 explain 帮助。
开始操作

candidate@master01:~$ vim pvc.yaml
apiVersion: v1
kind: PersistentVolumeClaim
metadata:
  name: pv-volume
spec:
  storageClassName: csi-hostpath-sc
  accessModes:
    - ReadWriteOnce
  resources:
    requests:
      storage: 10Mi

candidate@master01:~$ kubectl apply -f pvc.yaml
persistentvolumeclaim/pv-volume created
candidate@master01:~$ kubectl get pvc
NAME        STATUS   VOLUME   CAPACITY   ACCESS MODES   STORAGECLASS      AGE
pv-volume   Bound    pv01     10Mi       RWO            csi-hostpath-sc   26s

candidate@master01:~$ vim pod-pvc.yaml
apiVersion: v1
kind: Pod
metadata:
  name: web-server
spec:
  volumes:
    - name: task-pv-storage
      persistentVolumeClaim:
        claimName: pv-volume
  containers:
    - name: nginx
      image: nginx:1.16
      volumeMounts:
        - mountPath: "/usr/share/nginx/html"
          name: task-pv-storage

candidate@master01:~$ kubectl apply -f pod-pvc.yaml
pod/web-server created


更改大小,并记录过程。
# 将 storage: 10Mi 改为 storage: 70Mi (模拟环境里会报错,下面有解释。)
# 注意是修改上面的 spec:里面的 storage:
kubectl edit pvc pv-volume --record #模拟环境是 nfs 存储,操作时,会有报错忽略即可。考试时用的动态存储,不会报错的。

模拟环境使用的是 nfs 做后端存储,是不支持动态扩容 pvc 的(:wq 保存退出时,会报错)。
所以最后一步修改为 70Mi,只是操作一下即可。换成 ceph 做后端存储,可以,但是集群资源太少,无法做 ceph。
12.查看 pod 日志
设置配置环境:
[candidate@node-1] $ kubectl config use-context k8s
Task
监控 pod foo 的日志并:
提取与错误 RLIMIT_NOFILE 相对应的日志行
将这些日志行写入 /opt/KUTR00101/foo
考点:kubectl logs 命令
考试时务必执行,切换集群。模拟环境中不需要执行。
# kubectl config use-context k8s
开始操作
candidate@master01:~$ kubectl logs  foo| egrep "RLIMIT_NOFILE" >> /opt/KUTR00101/foo
13.使用 sidecar 代理容器日志
设置配置环境:
[candidate@node-1] $ kubectl config use-context k8s
Context
将一个现有的 Pod 集成到 Kubernetes 的内置日志记录体系结构中(例如 kubectl logs)。
添加 streaming sidecar 容器是实现此要求的一种好方法。
Task
使用 busybox Image 来将名为 sidecar 的 sidecar 容器添加到现有的 Pod 11-factor-app 中。
新的 sidecar 容器必须运行以下命令:
/bin/sh -c tail -n+1 -f /var/log/11-factor-app.log
使用挂载在/var/log 的 Volume,使日志文件 11-factor-app.log 可用于 sidecar 容器。
除了添加所需要的 volume mount 以外,请勿更改现有容器的规格。
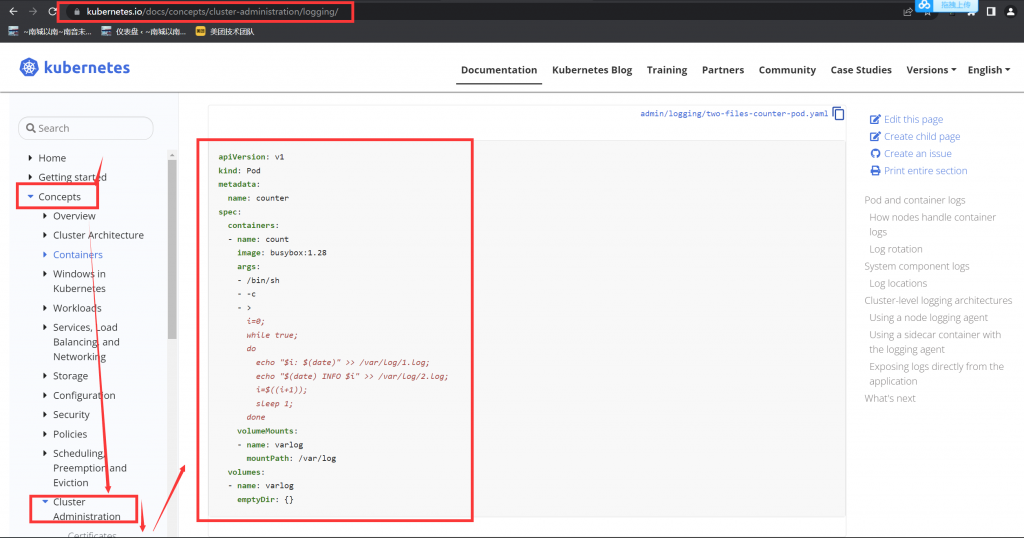
考试时务必执行,切换集群。模拟环境中不需要执行。
# kubectl config use-context k8s
通过 kubectl get pod -o yaml 的方法备份原始 pod 信息,删除旧的 pod 11-factor-app
copy 一份新 yaml 文件,添加 一个名称为 sidecar 的容器
新建 emptyDir 的卷,确保两个容器都挂载了 /var/log 目录
新建含有 sidecar 的 pod,并通过 kubectl logs 验证

开始操作
# 导出这个 pod 的 yaml 文件
# 备份 yaml 文件,防止改错了,回退。

candidate@master01:~$ kubectl get pod 11-factor-app  -o yaml > varlog.yaml
candidate@master01:~$ cp varlog.yaml varlog.yaml.bak
#按如下要求修改
candidate@master01:~$ cat varlog.yaml
apiVersion: v1
kind: Pod
metadata:
  annotations:
    cni.projectcalico.org/containerID: fce8efad7c238c4001e4ba575ddfcc9b2801f86b24353ac73d7e33d8ab031395
    cni.projectcalico.org/podIP: 10.244.140.103/32
    cni.projectcalico.org/podIPs: 10.244.140.103/32
  creationTimestamp: "2023-02-05T03:25:50Z"
  name: 11-factor-app
  namespace: default
  resourceVersion: "39362"
  uid: 6772944f-2f74-4e84-a119-e40b6e8ddf86
spec:
  containers:
  - args:
    - /bin/sh
    - -c
    - |
      i=0; while true; do
        echo "$(date) INFO $i" >> /var/log/11-factor-app.log;
        i=$((i+1));
        sleep 1;
      done
    image: busybox
    imagePullPolicy: IfNotPresent
    name: count
    resources: {}
    terminationMessagePath: /dev/termination-log
    terminationMessagePolicy: File
    volumeMounts:
    - mountPath: /var/run/secrets/kubernetes.io/serviceaccount
      name: kube-api-access-dc9b5
      readOnly: true
    - name: varlog                                                     #新增
      mountPath: /var/log                                              #新增
  - name: sidecar                                                      #新增
    image: busybox                                                     #新增
    args: [/bin/sh, -c, 'tail -n+1 -f /var/log/11-factor-app.log']     #新增
    volumeMounts:                                                      #新增
    - name: varlog                                                     #新增
      mountPath: /var/log                                              #新增
  dnsPolicy: ClusterFirst
  enableServiceLinks: true
  nodeName: node02
  preemptionPolicy: PreemptLowerPriority
  priority: 0
  restartPolicy: Always
  schedulerName: default-scheduler
  securityContext: {}
  serviceAccount: default
  serviceAccountName: default
  terminationGracePeriodSeconds: 30
  tolerations:
  - effect: NoExecute
    key: node.kubernetes.io/not-ready
    operator: Exists
    tolerationSeconds: 300
  - effect: NoExecute
    key: node.kubernetes.io/unreachable
    operator: Exists
    tolerationSeconds: 300
  volumes:
  - name: kube-api-access-dc9b5
    projected:
      defaultMode: 420
      sources:
      - serviceAccountToken:
          expirationSeconds: 3607
          path: token
      - configMap:
          items:
          - key: ca.crt
            path: ca.crt
          name: kube-root-ca.crt
      - downwardAPI:
          items:
          - fieldRef:
              apiVersion: v1
              fieldPath: metadata.namespace
            path: namespace
  - name: varlog    #新增
    emptyDir: {}    #新增

# 删除原先的 pod,大于需要等 2 分钟。
# 检查一下是否删除了
# 新建这个 pod
candidate@master01:~$ kubectl delete pod 11-factor-app
pod "11-factor-app" deleted
candidate@master01:~$ kubectl get pod 11-factor-app
Error from server (NotFound): pods "11-factor-app" not found
candidate@master01:~$ kubectl apply -f varlog.yaml
pod/11-factor-app created

#检查
# 考试时,仅使用第一条检查一下结果即可
kubectl logs 11-factor-app sidecar
# kubectl exec 11-factor-app -c sidecar -- tail -f /var/log/11-factor-app.log
# kubectl exec 11-factor-app -c count -- tail -f /var/log/11-factor-app.log14.升级集群
设置配置环境:
[candidate@node-1] $ kubectl config use-context mk8s
Task
现有的 Kubernetes 集群正在运行版本 1.26.0。仅将 master 节点上的所有 Kubernetes 控制平面和节点组件升级到版本 1.26.1。
确保在升级之前 drain master 节点,并在升级后 uncordon master 节点。
可以使用以下命令,通过 ssh 连接到 master 节点:
ssh master01
可以使用以下命令,在该 master 节点上获取更高权限:
sudo -i
另外,在主节点上升级 kubelet 和 kubectl。
请不要升级工作节点,etcd,container 管理器,CNI 插件, DNS 服务或任何其他插件
(注意,考试敲命令时,注意要升级的版本,根据题目要求输入具体的升级版本!!!)
考点:如何离线主机,并升级控制面板和升级节点
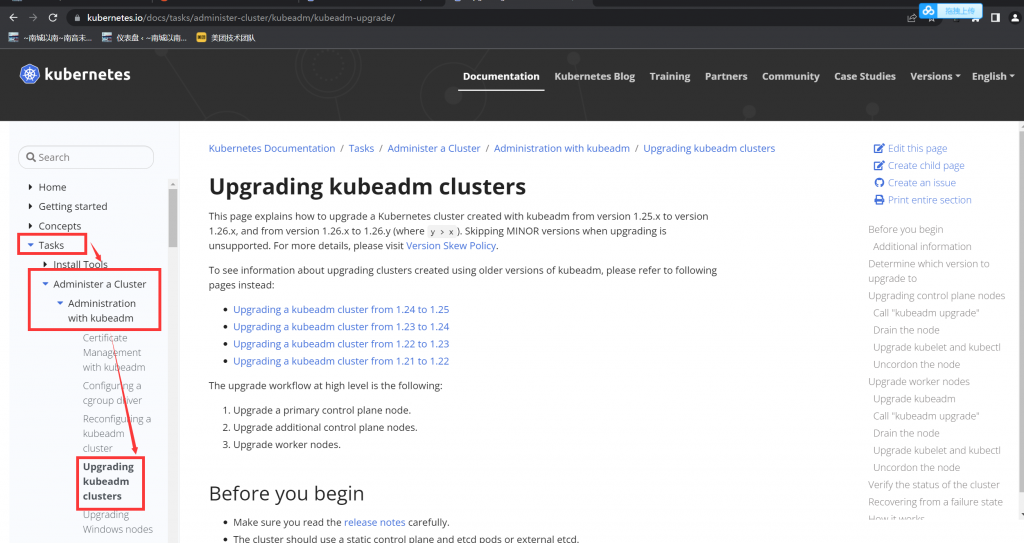
考试时务必执行,切换集群。模拟环境中不需要执行。
# kubectl config use-context mk8s
开始操作

candidate@master01:~$ kubectl get nodes
NAME       STATUS   ROLES           AGE   VERSION
master01   Ready    control-plane   50d   v1.26.0
node01     Ready    <none>          50d   v1.26.0
node02     Ready    <none>          50d   v1.26.0

# cordon 停止调度,将 node 调为 SchedulingDisabled。新 pod 不会被调度到该 node,但在该 node 的旧 pod 不受影响。
# drain 驱逐节点。首先,驱逐该 node 上的 pod,并在其他节点重新创建。接着,将节点调为 SchedulingDisabled。
# 所以 kubectl cordon master01 这条,可写可不写。但我一向做事严谨,能复杂,就绝不简单了事。。。所以就写了

candidate@master01:~$ kubectl cordon master01
node/master01 cordoned
candidate@master01:~$ kubectl drain master01 --ignore-daemonsets
node/master01 already cordoned
Warning: ignoring DaemonSet-managed Pods: calico-system/calico-node-kpbwv, calico-system/csi-node-driver-4277d, kube-system/kube-proxy-fwtxx
evicting pod calico-system/calico-kube-controllers-6b7b9c649d-qjwjx
evicting pod kube-system/coredns-5bbd96d687-7p5mt
evicting pod kube-system/coredns-5bbd96d687-2vsp8
pod/calico-kube-controllers-6b7b9c649d-qjwjx evicted
pod/coredns-5bbd96d687-7p5mt evicted
pod/coredns-5bbd96d687-2vsp8 evicted
node/master01 drained


# ssh 到 master 节点,并切换到 root 下
ssh master01
sudo -i

apt-get update
apt-cache show kubeadm|grep 1.26.1
apt-get install kubeadm=1.26.1-00

检查 kubeadm 升级后的版本
root@master01:~# kubeadm version
kubeadm version: &version.Info{Major:"1", Minor:"26", GitVersion:"v1.26.1", GitCommit:"8f94681cd294aa8cfd3407b8191f6c70214973a4", GitTreeState:"clean", BuildDate:"2023-01-18T15:56:50Z", GoVersion:"go1.19.5", Compiler:"gc", Platform:"linux/amd64"}

# 验证升级计划,会显示很多可升级的版本,我们关注题目要求升级到的那个版本。
kubeadm upgrade plan
# 排除 etcd,升级其他的,提示时,输入 y
kubeadm upgrade apply v1.26.1 --etcd-upgrade=false

#升级 kubelet
apt-get install kubelet=1.26.1-00
kubelet --version

升级 kubectl
apt-get install kubectl=1.26.1-00
kubectl version

# 退出 root,退回到 candidate@master01
exit
# 退出 master01,退回到 candidate@node01
exit

恢复 master01 调度
kubectl uncordon master01

检查 master01 是否为 Ready
candidate@master01:~$ kubectl get nodes
NAME       STATUS   ROLES           AGE   VERSION
master01   Ready    control-plane   50d   v1.26.1
node01     Ready    <none>          50d   v1.26.0
node02     Ready    <none>          50d   v1.26.0
升级命令执行的效果
root@master01:~# apt-get update
Hit:1 http://mirrors.ustc.edu.cn/ubuntu focal InRelease
Get:2 http://mirrors.ustc.edu.cn/ubuntu focal-updates InRelease [114 kB]
Get:3 http://mirrors.ustc.edu.cn/ubuntu focal-backports InRelease [108 kB]
Get:4 http://mirrors.ustc.edu.cn/ubuntu focal-security InRelease [114 kB]
Get:5 http://mirrors.ustc.edu.cn/docker-ce/linux/ubuntu focal InRelease [57.7 kB]
Get:6 http://mirrors.ustc.edu.cn/kubernetes/apt kubernetes-xenial InRelease [8,993 B]
Get:7 http://mirrors.ustc.edu.cn/ubuntu focal-updates/main amd64 Packages [2,430 kB]
Get:8 http://mirrors.ustc.edu.cn/ubuntu focal-updates/main Translation-en [416 kB]
Get:9 http://mirrors.ustc.edu.cn/ubuntu focal-updates/main amd64 c-n-f Metadata [16.4 kB]
Get:10 http://mirrors.ustc.edu.cn/ubuntu focal-updates/restricted amd64 Packages [1,671 kB]
Get:11 http://mirrors.ustc.edu.cn/ubuntu focal-updates/restricted Translation-en [235 kB]
Get:12 http://mirrors.ustc.edu.cn/ubuntu focal-updates/restricted amd64 c-n-f Metadata [620 B]
Get:13 http://mirrors.ustc.edu.cn/ubuntu focal-updates/universe amd64 Packages [1,039 kB]
Get:14 http://mirrors.ustc.edu.cn/ubuntu focal-updates/universe Translation-en [244 kB]
Get:15 http://mirrors.ustc.edu.cn/ubuntu focal-updates/universe amd64 c-n-f Metadata [24.0 kB]
Get:16 http://mirrors.ustc.edu.cn/ubuntu focal-updates/multiverse amd64 Packages [25.1 kB]
Get:17 http://mirrors.ustc.edu.cn/ubuntu focal-updates/multiverse amd64 c-n-f Metadata [592 B]
Get:18 http://mirrors.ustc.edu.cn/ubuntu focal-backports/universe amd64 Packages [24.9 kB]
Get:19 http://mirrors.ustc.edu.cn/ubuntu focal-backports/universe amd64 c-n-f Metadata [880 B]
Get:20 http://mirrors.ustc.edu.cn/ubuntu focal-security/main amd64 Packages [2,049 kB]
Get:21 http://mirrors.ustc.edu.cn/ubuntu focal-security/main Translation-en [334 kB]
Get:22 http://mirrors.ustc.edu.cn/ubuntu focal-security/main amd64 c-n-f Metadata [12.5 kB]
Get:23 http://mirrors.ustc.edu.cn/ubuntu focal-security/restricted amd64 Packages [1,561 kB]
Get:24 http://mirrors.ustc.edu.cn/ubuntu focal-security/restricted Translation-en [220 kB]
Get:25 http://mirrors.ustc.edu.cn/ubuntu focal-security/restricted amd64 c-n-f Metadata [624 B]
Get:26 http://mirrors.ustc.edu.cn/ubuntu focal-security/universe amd64 Packages [813 kB]
Get:27 http://mirrors.ustc.edu.cn/ubuntu focal-security/universe Translation-en [162 kB]
Get:28 http://mirrors.ustc.edu.cn/ubuntu focal-security/universe amd64 c-n-f Metadata [17.4 kB]
Get:29 http://mirrors.ustc.edu.cn/ubuntu focal-security/multiverse amd64 Packages [22.9 kB]
Get:30 http://mirrors.ustc.edu.cn/ubuntu focal-security/multiverse Translation-en [5,488 B]
Get:31 http://mirrors.ustc.edu.cn/ubuntu focal-security/multiverse amd64 c-n-f Metadata [516 B]
Get:32 http://mirrors.ustc.edu.cn/docker-ce/linux/ubuntu focal/stable amd64 Packages [24.9 kB]
Ign:33 http://mirrors.ustc.edu.cn/kubernetes/apt kubernetes-xenial/main amd64 Packages
Get:33 http://mirrors.ustc.edu.cn/kubernetes/apt kubernetes-xenial/main amd64 Packages [64.5 kB]
Fetched 11.8 MB in 5s (2,234 kB/s)
Reading package lists... Done
root@master01:~# apt-cache show kubeadm|grep 1.26.1
Version: 1.26.1-00
Filename: pool/kubeadm_1.26.1-00_amd64_68a7f95a50cafeec7ca7d8b6648253be51f4a79d84a8d9de84aca88a8b2f8c41.deb
root@master01:~# apt-get install kubeadm=1.26.1-00
Reading package lists... Done
Building dependency tree
Reading state information... Done
The following packages will be upgraded:
  kubeadm
1 upgraded, 0 newly installed, 0 to remove and 99 not upgraded.
Need to get 9,732 kB of archives.
After this operation, 0 B of additional disk space will be used.
Get:1 http://mirrors.ustc.edu.cn/kubernetes/apt kubernetes-xenial/main amd64 kubeadm amd64 1.26.1-00 [9,732 kB]
Fetched 9,732 kB in 1s (8,463 kB/s)
(Reading database ... 110840 files and directories currently installed.)
Preparing to unpack .../kubeadm_1.26.1-00_amd64.deb ...
Unpacking kubeadm (1.26.1-00) over (1.26.0-00) ...
Setting up kubeadm (1.26.1-00) ...
root@master01:~# kubeadm version
kubeadm version: &version.Info{Major:"1", Minor:"26", GitVersion:"v1.26.1", GitCommit:"8f94681cd294aa8cfd3407b8191f6c70214973a4", GitTreeState:"Date:"2023-01-18T15:56:50Z", GoVersion:"go1.19.5", Compiler:"gc", Platform:"linux/amd64"}
root@master01:~#
root@master01:~# kubeadm version
kubeadm version: &version.Info{Major:"1", Minor:"26", GitVersion:"v1.26.1", GitCommit:"8f94681cd294aa8cfd3407b8191f6c70214973a4", GitTreeState:"Date:"2023-01-18T15:56:50Z", GoVersion:"go1.19.5", Compiler:"gc", Platform:"linux/amd64"}
root@master01:~# kubeadm upgrade plan
[upgrade/config] Making sure the configuration is correct:
[upgrade/config] Reading configuration from the cluster...
[upgrade/config] FYI: You can look at this config file with 'kubectl -n kube-system get cm kubeadm-config -o yaml'
[preflight] Running pre-flight checks.
[upgrade] Running cluster health checks
[upgrade] Fetching available versions to upgrade to
[upgrade/versions] Cluster version: v1.26.0
[upgrade/versions] kubeadm version: v1.26.1
[upgrade/versions] Target version: v1.26.3
[upgrade/versions] Latest version in the v1.26 series: v1.26.3

Components that must be upgraded manually after you have upgraded the control plane with 'kubeadm upgrade apply':
COMPONENT   CURRENT       TARGET
kubelet     3 x v1.26.0   v1.26.3

Upgrade to the latest version in the v1.26 series:

COMPONENT                 CURRENT   TARGET
kube-apiserver            v1.26.0   v1.26.3
kube-controller-manager   v1.26.0   v1.26.3
kube-scheduler            v1.26.0   v1.26.3
kube-proxy                v1.26.0   v1.26.3
CoreDNS                   v1.9.3    v1.9.3
etcd                      3.5.6-0   3.5.6-0

You can now apply the upgrade by executing the following command:

	kubeadm upgrade apply v1.26.3

Note: Before you can perform this upgrade, you have to update kubeadm to v1.26.3.

_____________________________________________________________________


The table below shows the current state of component configs as understood by this version of kubeadm.
Configs that have a "yes" mark in the "MANUAL UPGRADE REQUIRED" column require manual config upgrade or
resetting to kubeadm defaults before a successful upgrade can be performed. The version to manually
upgrade to is denoted in the "PREFERRED VERSION" column.

API GROUP                 CURRENT VERSION   PREFERRED VERSION   MANUAL UPGRADE REQUIRED
kubeproxy.config.k8s.io   v1alpha1          v1alpha1            no
kubelet.config.k8s.io     v1beta1           v1beta1             no
_____________________________________________________________________

root@master01:~# kubeadm upgrade apply v1.26.1 --etcd-upgrade=false
[upgrade/config] Making sure the configuration is correct:
[upgrade/config] Reading configuration from the cluster...
[upgrade/config] FYI: You can look at this config file with 'kubectl -n kube-system get cm kubeadm-config -o yaml'
[preflight] Running pre-flight checks.
[upgrade] Running cluster health checks
[upgrade/version] You have chosen to change the cluster version to "v1.26.1"
[upgrade/versions] Cluster version: v1.26.0
[upgrade/versions] kubeadm version: v1.26.1
[upgrade] Are you sure you want to proceed? [y/N]: y
[upgrade/prepull] Pulling images required for setting up a Kubernetes cluster
[upgrade/prepull] This might take a minute or two, depending on the speed of your internet connection
[upgrade/prepull] You can also perform this action in beforehand using 'kubeadm config images pull'
[upgrade/apply] Upgrading your Static Pod-hosted control plane to version "v1.26.1" (timeout: 5m0s)...
[upgrade/staticpods] Writing new Static Pod manifests to "/etc/kubernetes/tmp/kubeadm-upgraded-manifests2027668244"
[upgrade/staticpods] Preparing for "kube-apiserver" upgrade
[upgrade/staticpods] Renewing apiserver certificate
[upgrade/staticpods] Renewing apiserver-kubelet-client certificate
[upgrade/staticpods] Renewing front-proxy-client certificate
[upgrade/staticpods] Renewing apiserver-etcd-client certificate
[upgrade/staticpods] Moved new manifest to "/etc/kubernetes/manifests/kube-apiserver.yaml" and backed up old manifest to "/etc/kubernetes/tmp/kumanifests-2023-03-27-17-53-10/kube-apiserver.yaml"
[upgrade/staticpods] Waiting for the kubelet to restart the component
[upgrade/staticpods] This might take a minute or longer depending on the component/version gap (timeout 5m0s)
[apiclient] Found 1 Pods for label selector component=kube-apiserver
[upgrade/staticpods] Component "kube-apiserver" upgraded successfully!
[upgrade/staticpods] Preparing for "kube-controller-manager" upgrade
[upgrade/staticpods] Renewing controller-manager.conf certificate
[upgrade/staticpods] Moved new manifest to "/etc/kubernetes/manifests/kube-controller-manager.yaml" and backed up old manifest to "/etc/kubernetm-backup-manifests-2023-03-27-17-53-10/kube-controller-manager.yaml"
[upgrade/staticpods] Waiting for the kubelet to restart the component
[upgrade/staticpods] This might take a minute or longer depending on the component/version gap (timeout 5m0s)
[apiclient] Found 1 Pods for label selector component=kube-controller-manager
[upgrade/staticpods] Component "kube-controller-manager" upgraded successfully!
[upgrade/staticpods] Preparing for "kube-scheduler" upgrade
[upgrade/staticpods] Renewing scheduler.conf certificate
[upgrade/staticpods] Moved new manifest to "/etc/kubernetes/manifests/kube-scheduler.yaml" and backed up old manifest to "/etc/kubernetes/tmp/kumanifests-2023-03-27-17-53-10/kube-scheduler.yaml"
[upgrade/staticpods] Waiting for the kubelet to restart the component
[upgrade/staticpods] This might take a minute or longer depending on the component/version gap (timeout 5m0s)
[apiclient] Found 1 Pods for label selector component=kube-scheduler
[upgrade/staticpods] Component "kube-scheduler" upgraded successfully!
[upload-config] Storing the configuration used in ConfigMap "kubeadm-config" in the "kube-system" Namespace
[kubelet] Creating a ConfigMap "kubelet-config" in namespace kube-system with the configuration for the kubelets in the cluster
[kubelet-start] Writing kubelet configuration to file "/var/lib/kubelet/config.yaml"
[bootstrap-token] Configured RBAC rules to allow Node Bootstrap tokens to get nodes
[bootstrap-token] Configured RBAC rules to allow Node Bootstrap tokens to post CSRs in order for nodes to get long term certificate credentials
[bootstrap-token] Configured RBAC rules to allow the csrapprover controller automatically approve CSRs from a Node Bootstrap Token
[bootstrap-token] Configured RBAC rules to allow certificate rotation for all node client certificates in the cluster
[addons] Applied essential addon: CoreDNS
[addons] Applied essential addon: kube-proxy

[upgrade/successful] SUCCESS! Your cluster was upgraded to "v1.26.1". Enjoy!

[upgrade/kubelet] Now that your control plane is upgraded, please proceed with upgrading your kubelets if you haven't already done so.
root@master01:~# apt-get install kubelet=1.26.1-00
Reading package lists... Done
Building dependency tree
Reading state information... Done
The following packages will be upgraded:
  kubelet
1 upgraded, 0 newly installed, 0 to remove and 99 not upgraded.
Need to get 20.5 MB of archives.
After this operation, 4,096 B of additional disk space will be used.
Get:1 http://mirrors.ustc.edu.cn/kubernetes/apt kubernetes-xenial/main amd64 kubelet amd64 1.26.1-00 [20.5 MB]
Fetched 20.5 MB in 2s (9,095 kB/s)
(Reading database ... 110840 files and directories currently installed.)
Preparing to unpack .../kubelet_1.26.1-00_amd64.deb ...
Unpacking kubelet (1.26.1-00) over (1.26.0-00) ...
Setting up kubelet (1.26.1-00) ...
root@master01:~# kubelet --version
Kubernetes v1.26.1
root@master01:~# apt-get install kubectl=1.26.1-00
Reading package lists... Done
Building dependency tree
Reading state information... Done
The following packages will be upgraded:
  kubectl
1 upgraded, 0 newly installed, 0 to remove and 99 not upgraded.
Need to get 10.1 MB of archives.
After this operation, 0 B of additional disk space will be used.
Get:1 http://mirrors.ustc.edu.cn/kubernetes/apt kubernetes-xenial/main amd64 kubectl amd64 1.26.1-00 [10.1 MB]
Fetched 10.1 MB in 1s (7,373 kB/s)
(Reading database ... 110840 files and directories currently installed.)
Preparing to unpack .../kubectl_1.26.1-00_amd64.deb ...
Unpacking kubectl (1.26.1-00) over (1.26.0-00) ...
Setting up kubectl (1.26.1-00) ...
root@master01:~# kubectl version
WARNING: This version information is deprecated and will be replaced with the output from kubectl version --short.  Use --output=yaml|json to gersion.
Client Version: version.Info{Major:"1", Minor:"26", GitVersion:"v1.26.1", GitCommit:"8f94681cd294aa8cfd3407b8191f6c70214973a4", GitTreeState:"clte:"2023-01-18T15:58:16Z", GoVersion:"go1.19.5", Compiler:"gc", Platform:"linux/amd64"}
Kustomize Version: v4.5.7
Server Version: version.Info{Major:"1", Minor:"26", GitVersion:"v1.26.1", GitCommit:"8f94681cd294aa8cfd3407b8191f6c70214973a4", GitTreeState:"clte:"2023-01-18T15:51:25Z", GoVersion:"go1.19.5", Compiler:"gc", Platform:"linux/amd64"}
15.备份还原 etcd
设置配置环境
此项目无需更改配置环境。但是,在执行此项目之前,请确保您已返回初始节点。
[candidate@master01] $ exit #注意,这个之前是在 master01 上,所以要 exit 退到 node01,如果已经是 node01 了,就不要再 exit 了。
Task
首先,为运行在 https://11.0.1.111:2379 上的现有 etcd 实例创建快照并将快照保存到 /var/lib/backup/etcd-snapshot.db
(注意,真实考试中,这里写的是 https://127.0.0.1:2379)
为给定实例创建快照预计能在几秒钟内完成。 如果该操作似乎挂起,则命令可能有问题。用 CTRL + C 来取消操作,然后重试。
然后还原位于/data/backup/etcd-snapshot-previous.db 的现有先前快照。
提供了以下 TLS 证书和密钥,以通过 etcdctl 连接到服务器。
CA 证书: /opt/KUIN00601/ca.crt
客户端证书: /opt/KUIN00601/etcd-client.crt
客户端密钥: /opt/KUIN00601/etcd-client.key
考点:etcd 的备份和还原命令
另外,特别注意,etcd 这道题,在考试时做完后,就不要回头检查或者操作了。因为它是用的前一道题的集群,所以一旦你回头再做时,切换错集群了,且又将
etcd 还原了,反而可能影响别的考题。
注意集群用的是考试时的上一题的集群,所以无需再切换集群了。
但如果事后回来做这道题的话,切记要切换为正确的集群。
# kubectl config use-context xxxx
开始操作
确认一下 ssh 终端,是在[candidate@node-1] $ 初始节点。

candidate@node01:~$ etcdctl --endpoints=https://11.0.1.111:2379 --cacert="/opt/KUIN00601/ca.crt" --cert="/opt/KUIN00601/etcd-client.crt" --key="/opt/KUIN00601/etcd-client.key" snapshot save /var/lib/backup/etcd-snapshot.db
{"level":"info","ts":"2023-03-27T18:39:59.561+0800","caller":"snapshot/v3_snapshot.go:65","msg":"created temporary db file","path":"/var/lib/backup/etcd-snapshot.db.part"}
{"level":"info","ts":"2023-03-27T18:39:59.589+0800","logger":"client","caller":"v3@v3.5.6/maintenance.go:212","msg":"opened snapshot stream; downloading"}
{"level":"info","ts":"2023-03-27T18:39:59.590+0800","caller":"snapshot/v3_snapshot.go:73","msg":"fetching snapshot","endpoint":"https://11.0.1.111:2379"}
{"level":"info","ts":"2023-03-27T18:40:00.086+0800","logger":"client","caller":"v3@v3.5.6/maintenance.go:220","msg":"completed snapshot read; closing"}
{"level":"info","ts":"2023-03-27T18:40:00.111+0800","caller":"snapshot/v3_snapshot.go:88","msg":"fetched snapshot","endpoint":"https://11.0.1.111:2379","size":"12 MB","took":"now"}
{"level":"info","ts":"2023-03-27T18:40:00.111+0800","caller":"snapshot/v3_snapshot.go:97","msg":"saved","path":"/var/lib/backup/etcd-snapshot.db"}
Snapshot saved at /var/lib/backup/etcd-snapshot.db


检查:(考试时,这些检查动作,都可以不做)
etcdctl snapshot status /var/lib/backup/etcd-snapshot.db -wtable
candidate@node01:~$ etcdctl snapshot status /var/lib/backup/etcd-snapshot.db -wtable
Deprecated: Use etcdutl snapshot status instead.

+----------+----------+------------+------------+
|   HASH   | REVISION | TOTAL KEYS | TOTAL SIZE |
+----------+----------+------------+------------+
| 8bd60d97 |    74635 |       1541 |      12 MB |
+----------+----------+------------+------------+

还原:
# 考试时,/data/backup/etcd-snapshot-previous.db 的权限应该是只有 root 可读,所以需要使用 sudo 命令。
# 可以 ll /data/backup/etcd-snapshot-previous.db 检查一下读写权限和属主。
candidate@node01:~$ ll /var/lib/backup/etcd-snapshot.db
-rw-------+ 1 candidate candidate 11550752 Mar 27 18:40 /var/lib/backup/etcd-snapshot.db

# 不加 sudo 会报错 permission denied,
上面执行了 export ETCDCTL_API=3 了,下面就可以不写 ETCDCTL_API=3d 的,另外还原也是可以不写证书的。
candidate@node01:~$ sudo etcdctl --endpoints=https://11.0.1.111:2379 --cacert="/opt/KUIN00601/ca.crt" --cert="/opt/KUIN00601/etcd-client.crt" --key="/opt/KUIN00601/etcd-client.key" snapshot restore /var/lib/backup/etcd-snapshot.db
Deprecated: Use etcdutl snapshot restore instead.

2023-03-27T18:42:38+08:00	info	snapshot/v3_snapshot.go:248	restoring snapshot	{"path": "/var/lib/backup/etcd-snapshot.db", "wal-dir": "default.etcd/member/wal", "data-dir": "default.etcd", "snap-dir": "default.etcd/member/snap", "stack": "go.etcd.io/etcd/etcdutl/v3/snapshot.(*v3Manager).Restore\n\tgo.etcd.io/etcd/etcdutl/v3@v3.5.6/snapshot/v3_snapshot.go:254\ngo.etcd.io/etcd/etcdutl/v3/etcdutl.SnapshotRestoreCommandFunc\n\tgo.etcd.io/etcd/etcdutl/v3@v3.5.6/etcdutl/snapshot_command.go:147\ngo.etcd.io/etcd/etcdctl/v3/ctlv3/command.snapshotRestoreCommandFunc\n\tgo.etcd.io/etcd/etcdctl/v3/ctlv3/command/snapshot_command.go:129\ngithub.com/spf13/cobra.(*Command).execute\n\tgithub.com/spf13/cobra@v1.1.3/command.go:856\ngithub.com/spf13/cobra.(*Command).ExecuteC\n\tgithub.com/spf13/cobra@v1.1.3/command.go:960\ngithub.com/spf13/cobra.(*Command).Execute\n\tgithub.com/spf13/cobra@v1.1.3/command.go:897\ngo.etcd.io/etcd/etcdctl/v3/ctlv3.Start\n\tgo.etcd.io/etcd/etcdctl/v3/ctlv3/ctl.go:107\ngo.etcd.io/etcd/etcdctl/v3/ctlv3.MustStart\n\tgo.etcd.io/etcd/etcdctl/v3/ctlv3/ctl.go:111\nmain.main\n\tgo.etcd.io/etcd/etcdctl/v3/main.go:59\nruntime.main\n\truntime/proc.go:225"}
2023-03-27T18:42:38+08:00	info	membership/store.go:141	Trimming membership information from the backend...
2023-03-27T18:42:38+08:00	info	membership/cluster.go:421	added member	{"cluster-id": "cdf818194e3a8c32", "local-member-id": "0", "added-peer-id": "8e9e05c52164694d", "added-peer-peer-urls": ["http://localhost:2380"]}
2023-03-27T18:42:38+08:00	info	snapshot/v3_snapshot.go:269	restored snapshot	{"path": "/var/lib/backup/etcd-snapshot.db", "wal-dir": "default.etcd/member/wal", "data-dir": "default.etcd", "snap-dir": "default.etcd/member/snap"}

PS:扩展阅读
考试时,etcd 是在 node01 上运行的,所以考试时,考题里的网址写的是 https://127.0.0.1:2379。但是模拟环境里,虽然也模拟在 node01 上面执行数据恢复,但
etcd 实际是在 master01 节点,所以还原实际没有真正效果的。
真正恢复的时候 是必须要先将 etcd data 目录清理掉或者移走,然后再去执行 snapshot restore,这时集群的数据就一定和 snapshot 备份中的数据统一了。16.排查集群中故障节点
设置配置环境:
[candidate@node-1] $ kubectl config use-context wk8s
Task
名为 node02 的 Kubernetes worker node 处于 NotReady 状态。
调查发生这种情况的原因,并采取相应的措施将 node 恢复为 Ready 状态,确保所做的任何更改永久生效。
可以使用以下命令,通过 ssh 连接到 node02 节点:ssh node02
可以使用以下命令,在该节点上获取更高权限:
sudo -i
考试时务必执行,切换集群。模拟环境中不需要执行。
# kubectl config use-context wk8s
通过 get nodes 查看异常节点,登录节点查看 kubelet 等组件的 status 并判断原因。
真实考试时,这个异常节点的 kubelet 服务没有启动导致的,就这么简单。
执行初始化这道题的脚本 a.sh,模拟 node02 异常。
(考试时,不需要执行的!考试时切到这道题的集群后,那个 node 就是异常的。)

在 candidate@node01 上执行
sudo sh /opt/sh/a.sh
执行完 a.sh 脚本后,等 3 分钟,node02 才会挂掉。

candidate@node01:~$ kubectl get node -w
NAME       STATUS     ROLES           AGE   VERSION
master01   Ready      control-plane   50d   v1.26.1
node01     Ready      <none>          50d   v1.26.0
node02     NotReady   <none>          50d   v1.26.0
# ssh 到 node02 节点,并切换到 root 下
ssh node02
sudo -i

检查 kubelet 服务,考试时,会发现服务没有启动
systemctl status kubelet
root@node02:~# systemctl status kubelet.service
● kubelet.service - kubelet: The Kubernetes Node Agent
     Loaded: loaded (/lib/systemd/system/kubelet.service; disabled; vendor preset: enabled)
    Drop-In: /etc/systemd/system/kubelet.service.d
             └─10-kubeadm.conf
     Active: inactive (dead) since Mon 2023-03-27 18:46:35 CST; 1min 37s ago
       Docs: https://kubernetes.io/docs/home/
   Main PID: 1263 (code=exited, status=0/SUCCESS)

# 启动服务,并设置为开机启动
systemctl start kubelet
systemctl enable kubelet

root@node02:~# systemctl status kubelet.service
● kubelet.service - kubelet: The Kubernetes Node Agent
     Loaded: loaded (/lib/systemd/system/kubelet.service; enabled; vendor preset: enabled)
    Drop-In: /etc/systemd/system/kubelet.service.d
             └─10-kubeadm.conf
     Active: active (running) since Mon 2023-03-27 18:49:51 CST; 2s ago
       Docs: https://kubernetes.io/docs/home/
   Main PID: 133313 (kubelet)
      Tasks: 12 (limit: 2530)
     Memory: 80.8M
     CGroup: /system.slice/kubelet.service
             └─133313 /usr/bin/kubelet --bootstrap-kubeconfig=/etc/kubernetes/bootstrap-kubelet.conf --kubeconfig=/etc/kubernetes/kubelet.conf>


# 退出 root,退回到 candidate@node02
exit
# 退出 node02,退回到 candidate@node01
exit

再次检查节点, 确保 node02 节点恢复 Ready 状态
kubectl get nodes
candidate@node01:~$ kubectl get node
NAME       STATUS   ROLES           AGE   VERSION
master01   Ready    control-plane   50d   v1.26.1
node01     Ready    <none>          50d   v1.26.0
node02 Ready <none> 50d v1.26.17.节点维护
设置配置环境:
[candidate@node-1] $ kubectl config use-context ek8s
Task
将名为 node02 的 node 设置为不可用,并重新调度该 node 上所有运行的 pods。
考点:cordon 和 drain 命令的使用
考试时务必执行,切换集群。模拟环境中不需要执行。
# kubectl config use-context ek8s
开始操作
kubectl get node

kubectl drain node02 --ignore-daemonsets
# 注意,还有一个参数--delete-emptydir-data --force,这个考试时不用加,就可以正常 draini node02 的。
# 但如果执行后,有跟测试环境一样的报错(如下截图),则需要加上--delete-emptydir-data --force,会强制将 pod 移除。
# kubectl drain node02 --ignore-daemonsets --delete-emptydir-data --force

candidate@node01:~$ kubectl get node
NAME       STATUS                     ROLES           AGE   VERSION
master01   Ready                      control-plane   50d   v1.26.1
node01     Ready                      <none>          50d   v1.26.0
node02     Ready,SchedulingDisabled   <none>          50d   v1.26.0
candidate@node01:~$ kubectl get pod -A -o wide|grep node02
calico-system      calico-node-4kck4                          1/1     Running   7 (4h39m ago)    50d    11.0.1.113       node02     <none>           <none>
calico-system      csi-node-driver-k9kcl                      2/2     Running   14 (4h39m ago)   50d    10.244.140.100   node02     <none>           <none>
ingress-nginx      ingress-nginx-controller-9g98t             1/1     Running   4 (4h39m ago)    50d    11.0.1.113       node02     <none>           <none>
kube-system        kube-proxy-96zcj                           1/1     Running   0                59m    11.0.1.113       node02     <none>           <none>